Home Kubernetes Cluster Using ODROID HC2 Boards Part 2
Link to Part 1
In this continuing series we’re setting up the hardware and installing Ubuntu to the HC2s.
Let’s get building!
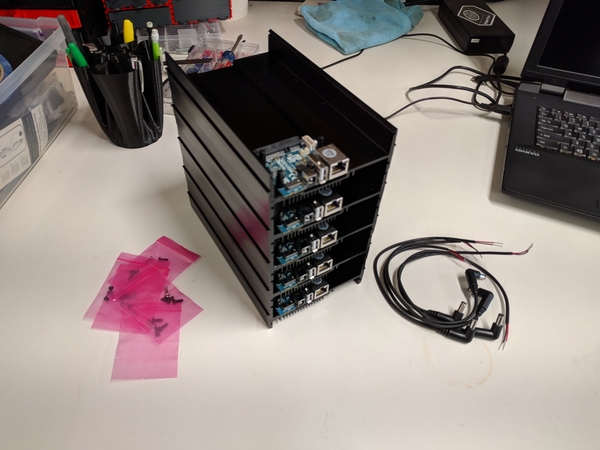
Get everything unboxed, and find yourself oddly pleased with how well the cases snap together to form your nice new tower. You can see here what they look like stacked, and you can see the barrel plugs I need to tie into my power supply.
I wired up the plugs to a single set of wires to make managing the easier. I just used a crimp and heat shrinked it to make it look nice, actually came out pretty good.
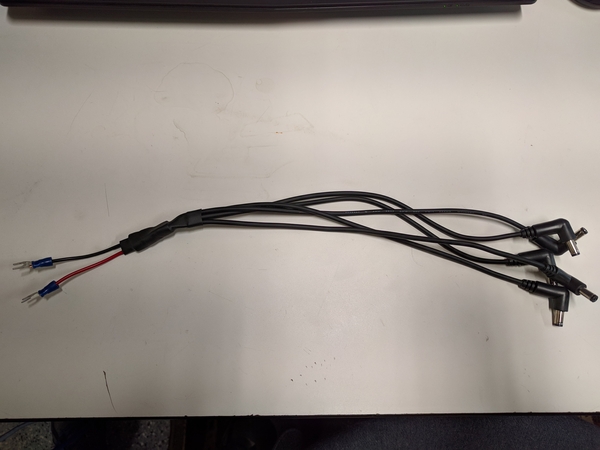
The power supply does not come with any plugs, so I harvested a cable from a computer power cord I had laying around. Just cut the end off, and crimp on some spade ends to screw into the power supply. This is mains wiring, if you are not comfortable with this, you may want to consider harvesting an old computer PSU, or just buying the bricks that ODROID sells.

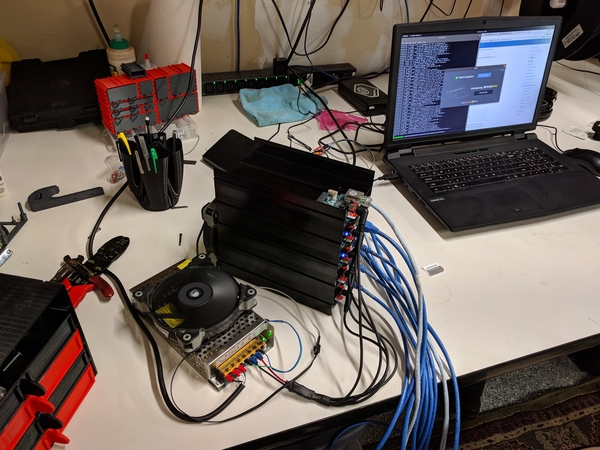
With all the power wires finished we can wire up the HC2s to the network, and fire it all up! This is what it looked like after all was said and done. I’m still modeling a “case” to hold it together a bit better, and mount the PSU to the stack as well as some fans. You’ll see some fans on it in a very janky setup here, it worked well enough to get me through the install.
I should note the fans aren’t required, I just have a bunch of case fans from an old PC laying around and thought it would be good to put them to use.
Install Ubuntu
This part is pretty simple, you’ll download the XU4 image (the HC2 and XU4 are the same platform) minimal install, flash it to a microSD card, boot it up. It is a slow process so be patient. This process may seem a little weird to you if you are not used to running a headless box, and haven’t seen/used an unattended install before. Basically the image is already scripted to install itself once the system is booted up, but with no monitor, we have not way to sort out the networking via the HC2 and will need to use other means.
- Flash the image
- Download the latest minimal image
- Flash it to a microSD card, I like etcher for this purpose
- Start the install
- This step is tricky, so read carefully
- Insert the microSD into the HC2
- Power up the HC2
- Wait ~10 minutes
- Reboot the HC2
- OK it’s actually really easy, I lied
- Sort out the networking
- This step really is tricky depending on your home network, you will need to figure out what IP your DHCP server has assigned to the HC2
- I did this via my routers web interface, all of the HC2s came up with the name of odroid, I powered them up one at a time
- Alternatives might be nmap, angry IP scanner, or really any network scanning tools should work
- Assign IPs to the Nodes
- The Nodes should be setup to get the same IPs on every boot, you can statically assign the IPs, or in my case I set my router to only offer the same IP when it sees a MAC address
- Ubuntu static IP assignment
Post OS install steps
Here is a quick rundown of how to setup the OS and install Kubernetes, I link to other documentation where it makes sense. I’d suggest reading all of the steps before doing anything as unwinding a borked Kubernetes install can be tedious.
- ssh into the Node
ssh root@$NODE_IPpassword should beodroid - Change root password
passwd- Follow prompts
- Update the OS
apt update && apt upgrade && apt install linux-image-xu3
- Install mDNS stuff
apt install avahi-daemon avahi-discover avahi-utils libnss-mdns mdns-scan- Pick a hostname for the nodes
hostnamectl set-hostname $YOUR_HOSTNAME- Edit
/etc/hostsand change the first line fromodroidto the name you picked above - Either reboot or run
hostname $YOUR_HOSTNAME- This resets the prompt, I tend to reboot here just in case any of the updates from above require it
- Install Docker CE
- Their docs are quite good, follow steps for
armhfwhen you install a repository - https://docs.docker.com/install/linux/docker-ce/ubuntu/
- Their docs are quite good, follow steps for
Install Kubernetes via kubeadm
This was going to be included above, but it got a bit long for a list, so now it is two lists. Again as with the steps above read all of the steps before proceeding!
- Again the docs here are quite good, so follow the kubeadm guide, but here are some notes that you should follow if you want to mimic my setup
- kubeadm install docs
- I am using flannel for my pod networking, I would normally choose Calico but they aren’t available on ARM as of this posting, use the following command to install flannel after doing
kubeadm init --pod-network-cidr 10.244.0.0/16on the master curl -sSL https://rawgit.com/coreos/flannel/v0.10.0/Documentation/kube-flannel.yml | sed "s/amd64/arm/g" | kubectl create -f -- Replace
v0.10.0with another version if you wish, this was the latest at the time of writing this - This deploys flannel as a daemonset, which means it will be automatically deployed on new Nodes
- Replace
- Setup access to Kubernetes cluster
- You’ll want to be able to access your cluster from your own machine, not from the master every time
- Install kubectl
- Copy the kubeconfig from the master to your personal machine, and use the
--kubeconfigoption of kubectl to point to your clusterscp root@k8s-master.local:/etc/kubernetes/admin.conf .kubectl --kubeconfig=admin.conf get node
Wrapping it up
That’s it, you’ve now got Kubernetes installed on your own little cluster! Go deploy something on it! I’ll be doing one more blog post where I migrate my blog to Kubernetes. I plan to include as much detail as I can about connecting services to the outside world.